Real Time Team Coding
So you want to work on some code with a colleague/friend/code wizard and needless to say in the 2020s, you’re not leaving your pajamas or house to do it - what do you do hotshot? (Speed reference anyone? No? I’ll see myself out.)
It turns out it’s easy, free and efficient (usually you only get to pick one of those) with Microsoft’s Visual Studio Code (VS Code for the cool kids). In this post, I’ll walk you through how to get set up and team-coding in no time.
Setting up VS Code
Unsurprisingly, you and your teammates will each need to get themselves a copy of Visual Studio Code, a free editor - dare I say IDE (see flame war here) - which has cross-platform support (Windows/Mac/Linux) and is highly customizable and extensible. Notably, VS Code now has native support for Jupyter Notebooks, allowing you to run your code in nice little cells and get inline visualizations to your heart’s delight, making it ideal for collaborating on data science projects.
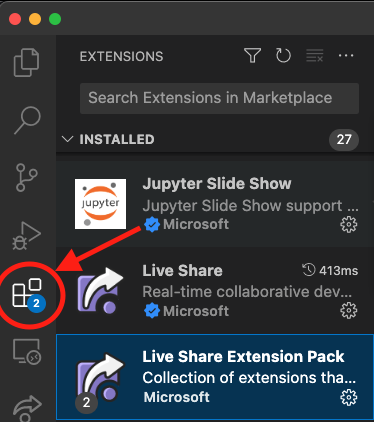
Once installed and open, mosey your way on over to the extensions button on the left hand side - circled in the below image:

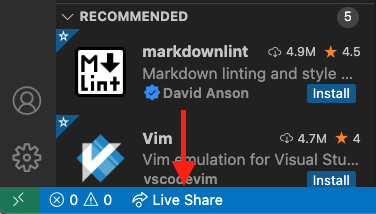
Once there search up the “Live Share” extension (also seen in the above image) made by Microsoft, and install it. This extension adds the ability to host a coding session, to which you can invite all of your teammates to work together in real time. As the extension instructions suggest, restart VS Code and then you should have a handy “Live Share” button on the bottom left of your editor:

Next, you’ll want to open up a VS Code window focused on the file or directory that will be the focus of your work (this can be done with File > Open or File > Open Folder… respectively), as this dictates the scope of what your invitees will be able to see and work on. To save some needless headache for later on, let me just state here that when you single click on a file in a directory it opens in preview mode, indicated by the filename in italics in the tab pane at the top. If you don’t make any changes, clicking on another file will open that file in the same tab and the previous file will be closed. To open multiple files up for inspection in separate tabs for you and your teammates, simply double click, rather than single click, on the filenames.
Then, a click of that Live Share button and a sign-in to either a Github or Microsoft account will get you hosting a session. If you authenticate via Github you will see a request for Github permissions in your browser as below:

Naturally, seeing such access requests should raise some red flags, and you can see some arguments for why these are requested and why they shouldn’t be here but a) it seems like this shouldn’t be too big of a risk for most use cases and b) you can always use a Microsoft account in its place.
With your session hosted, you should have a “Shared” button where the “Live Share” button was previously, and if you click on it you’ll be presented with a menu of options at the top of what you would like to do for the session:

Naturally, you probably want to copy an invite link and send it to your teammates. When they join, you should get a little notification in the bottom right (if they join as a guest, they will show up as anonymous) and you’ll be able to see their cursor…hovering ominously near that slapdash code block you now feel super embarassed about. If you want to give them a guided tour around the code, you can select “Focus Participants”, and this will drag them over to the current file you’re in and the exact area you’re inspecting, as well as move their view in accordance with yours. As you can see there is also a “Stop Collaboration Session” button for when you’re done for the day (or fed up with your teammates).
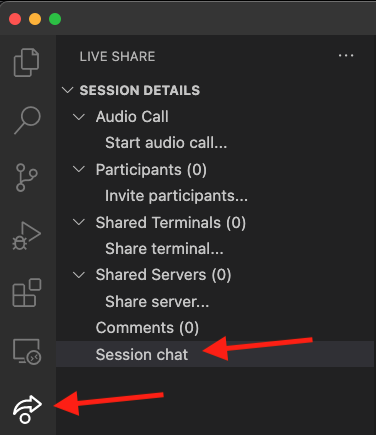
Note that VS Code offers a couple of ways to communicate with your teammates in the app, one of which you can see on the menu. If you installed the deprecated Live Share Audio extension you can try to make an audio call, though I don’t believe I ever had any success with it. Alternatively, if you select the Live Share button on the left side of the app (always look for that little hopping arrow symbol) you will be able to see details about the hosted session and use the “Session chat” for text chat.

Another significant option is the ability to share a terminal with participants in the session: this can be done with either read-only (i.e. they can watch you have fun) or read-write permissions so they can also execute programs on your machine.
If you’re developing in Python on Mac (I haven’t tested to see if the issue is
also present on Linux) and depend on Conda for environment management, you may
end up with an issue where even after activating the correct environment in the
newly created terminal python3 may invoke the wrong interpreter.
You can confirm which interpreter will be used with which python3.
If this is the case, one apparent workaround (which worked for me) offered
here is to
disable the setting for terminal environments being inherited from VS Code.
Once in settings, it turns out you can even type in the exact setting name
to quickly find what you need to change, like so:

Playing Nice with Git and Github
Mission accomplished, right? Everyone is happily slapping away at their keyboard in remote work heaven, but what happens when it comes time to commit this work? If you simply follow your normal git workflow, commit and push your work, to an outsider, it looks like the repository is full of just your work! Of course, you can give credit to others in your commit messages, but if using Github, you can actually do one better if you follow these instructions here. I won’t repeat the details here, as it is a good guide overall, but one silly note I will add is DO NOT assume those brackets around your co-author emails are optional as they are not, and omitting them will result in Github not displaying in the repository that a commit has multiple authors.
Cookie Points
For a pleasant teamwork experience, it is probably best to consider a couple of additional points. First, it goes without saying that you and your teammates should adhere to a certain style if there isn’t one already; spare yourselves the argument about where the brackets belong. Second, if you’re using a language like Python where spacing is significant or if the idea of tabs just makes you nauseous, then take a couple of steps.
- Enable the setting
View > Appearance > Render Whitespaceif it isn’t already. As the name suggests, this will display whitespace characters, with little dots for spaces and arrows for tabs. - Select that little button that defaults to “Tab Size: 4” on the bottom of the window, and make your selection about how you want to handle spacing. For instance, you can choose Indent Using Spaces and then choose 4 spaces so that every press of the tab key will insert 4 spaces, not a tab character.
Third, and this might seem like a minor point but think of it as common courtesy, endeavor to keep your lines to reasonable length, ideally 80 columns. This will ensure your code is readable on Github and the VS Code session of anyone coding without the benefit of a home IMAX screen. To make sure you adhere to 80 columns, you can open the settings.json file for VS Code by navigating to Settings > Profiles (Default) > Show Contents… and insert the attribute-value pair for a ruler to be present at 80 columns like so:

Wrap Up
In a short amount of time, and just a few button clicks, we’ve gone from zero to hero for coding with others. Surprisingly, this method is by no means a secret but was news to several fellow students. It always served well during projects, and can probably do the same in the workplace. VS Code is, if nothing else and as you’ve seen above, quite extensible, so even if it’s not immediately to your liking, there are probably some changes you can make to quickly turn it into a helpful platform for your use case. I haven’t yet found an alternative that quite lives up to its flexibility and ease of use, but I’ll mention a couple of platforms I have made use of previously.
- If running a Jupyter notebook is your need, Jupyter Lab actually has a collaborative editing feature, but will require hosting on a machine to which all users can gain access.
- Google Colab apparently had real time editing but this was slightly before my time. If nothing else others can still view and work on your notebook, just not in real time.
- Similarly, CoCalc is a platform which offers remote and collaborative Jupyter Notebooks: if memory serves you can get some free compute but it will be fairly limited.
I should also share a word of caution: be careful with permissions. Coding with friends is one thing, but do not offer access to your local files via a read-write terminal in Live Share (or your Google Drive files via a Colab notebook) to someone you cannot trust! That aside, go out there and have some fun collaboratively trying to understand why you’re getting segmentation faults!